
Way back in January I mentioned how much I wanted to make and build this chariot, and almost a year later I've finally made a start. It's just occurred to me that doing it for Zombtober would have been a good idea, but this is me we're talking about.
This metal masterpiece cost me $100. I justified the expenditure to myself on the grounds that:
i) I had the money (oh, the good old days!)
ii) I'd wanted it for ages after seeing it on Realm of Chaos 80s
iii) As $100 will just about get you a plastic Space Marine Chaplain, Harlequin Death Jester and Necron Cryptek, it's pretty good value for a model that's metal, is a classic Citadel sculpt, and has been out of production for almost 40 years.
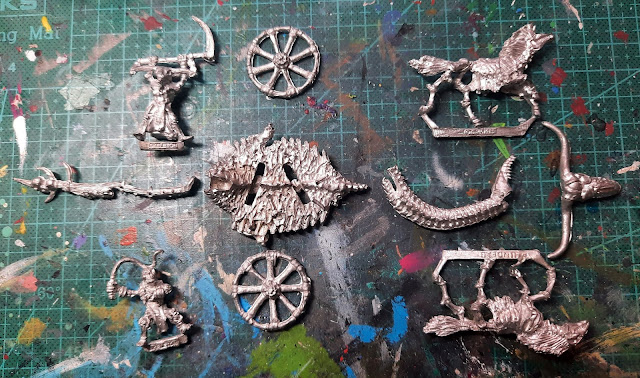
After doing a bit more googling, it turns out I don't actually have all the bits. There's supposed to be four more figures, as can be seen from an advert that appeared in White Dwarf 94:
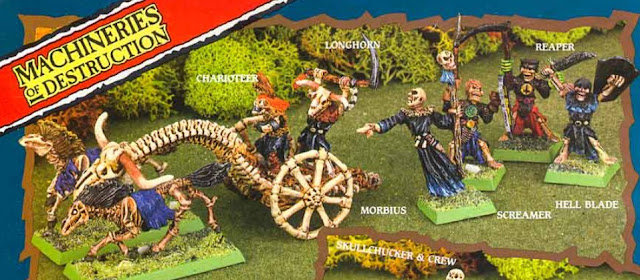
I have the Charioteer and Longhorn, but I'm missing Morbius, Screamer, Reaper and Hell Blade. I'm not too bothered about this as I didn't know the chariot came with six minis until googling it last week. I could go looking on Ebay for the missing minis, but I have a feeling they're going to be expensive so I'll leave them alone... for now.
The chariot was cleaned up and glued together, and it went together easier than I thought it would. I had to use some filler where the skull joins the neck and the neck joins the body, and Vallejo Plastic Putty did the job really well. The horses are just slotted into their bases without glue for now so they'll be easier to paint. Both Longhorn and the charioteer had their tabs snipped off and were stuck to temporary bases.
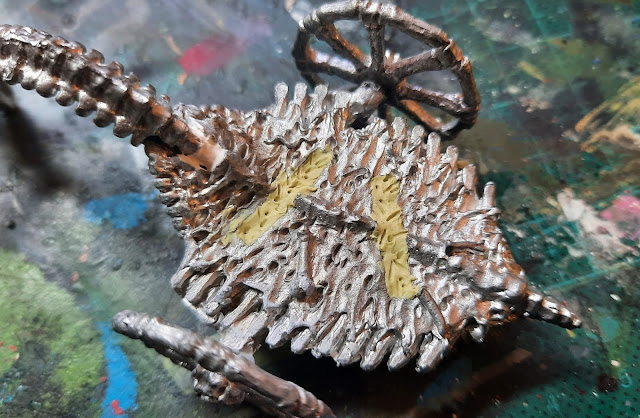
As I'd cut the slotta tabs off my minis, I had to fill the slots with something. I used Milliput because my greenstuff is still AWOL; it's not like I've chucked it out, it's somewhere on my desk. But as my desk looks like an explosion in a hobby store right now, I just decided to save time. I textured the Milliput using a pointed sculpting tool to try to match it to the metal as much as possible. Hopefully it won't be too easy to see these patches once it's all painted and the minis are standing on it.
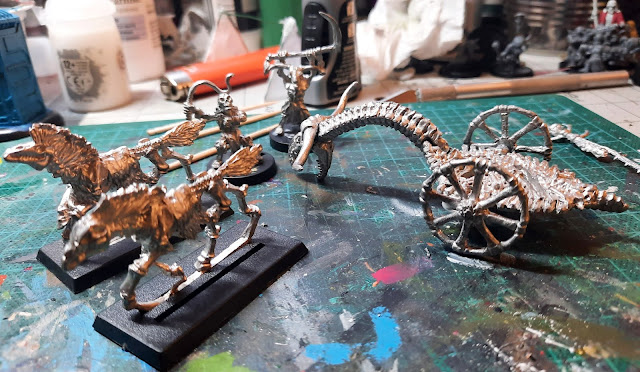
The chariot and horses were taken to the garage to be sprayed with white primer, and so to at least make a start I got on with painting the figures. Sorry about the slightly blurry phone pictures:
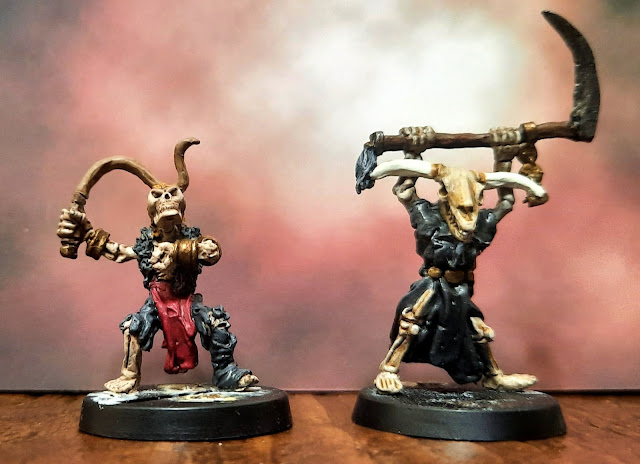
Here's an interesting fact: I hate painting bone. I said years back that I had a list of colours I really didn't like painting, which included white, purple, blue, yellow, brown and some others. I've got the hang of most of those but bone is one I still struggle with. I based all the skeletal bits with Reaper Aged Bone, shaded them with thinned Brown Wash and then went over them with thinned Bonewhite. I think it worked pretty well, and I wasn't too worried about exactly matching both minis' bone tones.
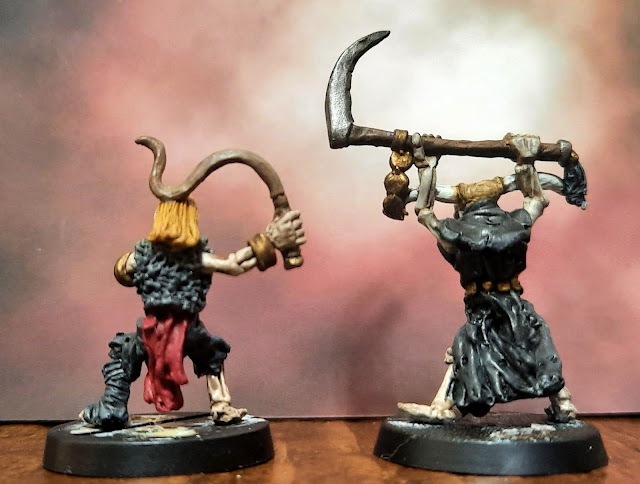
Both were primed white then their clothes were painted Black Grey. Longhorn's horns are Ivory and Off-White, and Bronze worked for his belt. His scythe has a Plate Metal blade and Burnt Umber and Mahogany Brown haft.
I decided to add some colour to the Charioteer by doing his tabard(?) in Dark Red and his flowing mane Gold Brown and Deep Yellow. His bracelets are Bronze, and the whip is Mahogany Brown for the handle and Forest Flesh for the whip bit. It could do with being a bit lighter.
So that's as far as I've got with the chariot. It's primed and ready to be painted, and it also has to be based properly, which should be fun. I'm hoping to get it finished this month in between doing my Mo'Vember entries.
Flippin love this model! Had it WAY back when I first got into Warhammer (3rd Ed) as I thought skellies would be loads of fun to play - boy was I wrong when your only opponent plays as dwarves and those suckers aren’t scared of anything…. WS2 warriors tend to die quickly against tough stun ties who won’t run screaming for the hills upon seeing the unliving dead like any other sane mortal would…. My fantasy undead army was soon pushed aside and i worked solely on my one true GW love, my Squats, from then on.
ReplyDeleteBit lengthy so sorry about that. Regardless of what I blather know about just know I love that you have this awesome kit and so far have painted the charioteer and champ superbly. Looking forward to seeing work on the actual chariot.
O and don’t worry about your “bone” scheme, it looks great from here and the fact that they don’t match exactly is perfect! Bones are different colours in rl just so’s ya know.
Yay, glad it makes you happy! Sorry to hear your skellies got slaughtered on the battlefield though. I too love this model, it's so classically mid-80s Citadel.
DeleteEven though bone is one of my "oh crap" colours I think the figures look good, and I just hope the chariot and horses come out as well as their riders.
I haven't seen this mini before but I love the Vampire Counts as they were known in Warhammer Fantasy so this is right up my alley. I can't wait to see how this project turns out as well.
ReplyDeleteWhen it comes to painting bone, I'd say you should decide whether you want to paint warm or cold bone colors first. I can't quite tell which direction you've gone above but I'd say warm is most likely. Games Workshop's Ushtabi Bone and Screaming Skull are easy to use and give good results, I find. You can use a slightly thinned down Seraphim Sepia wash to shade bone as well. Bone is something I've found that once I found some styles of it I like and feel confident in, I really enjoy painting it when I get the chance. I hope some of this info is helpful and makes you feel more confident in painting it.
Thanks, I didn't even think of bone colours being cold or warm, I'll keep that in mind when I get to the horses and chariot (hopefully soon). The Reaper and Vallejo colours I'm using work really well but I do need to get some Seraphim Sepia as my Vallejo Sepia Wash has about four drops left in it. I appreciate the advice!
DeleteOff to a great start Matt, the crew look fantastic, bone can be very different shades depending on it's age, the older it gets the darker it gets, and the bright cream colour tends to be treated. A good trick to making skeletons look more realistic, is make sure to paint the teeth in a lighter colour, this will give a more natural look.
ReplyDeleteI did paint Longhorn's teeth Ivory but you can't see them, and I totally forgot to paint the Charioteer's so I'll have to touch them up tomorrow. Thanks for the reminder, Dave! I'm happy with how the bone looks on both these figures and hopefully I can do the rest of the set as good.
DeleteThat is a nice kit, and you've done a great job painting it so far, my old skeleton army (well actually it's my eldest sons now as I gave it to him) is up in the loft I think, most of the foot and cavalry are GW (though there some other makes in there too, but the Chariots I used were Portage (Rafm in the US I think), and are more like actual chariots. (probably not worth $100 though) 😁
ReplyDeleteCheers Roger.
Thanks, Roger! I have to admit it took me a couple of minutes to decided whether it was worth $100, but as that's 10 GW plastic Terminators I thought it was worth the money. And it's such a good model, really well sculpted. I'll have an update posted soon, honest :-)
DeleteThey look good to me, but what do I know about skeltons - especially animated ones !
ReplyDeleteThanks Joe! I am really hoping these two little horrors don't become animated lol!
Delete