

I guessed this would be a bit of a sod to paint, and I wasn't too wrong. But happily the painting and basing went well in the end... I just wish I could say the same for the final steps.

Like the horses and figures, the chariot got a coat of Reaper Aged Bone over white spray primer. After that I jumped in the Outback to drive 12 miles to Bennington to pick up a pot of Citadel Seraphim Sepia to replace my Vallejo Sepia Wash so I could match the shading to the horses and riders. Ugh. But it was worth it.
As you can see above, the whole chariot except the horns and rug thing have been painted and shaded.


I had to pop the wheels off to paint their backs properly. I decanted some of the Seraphim Sepia into the empty Vallejo Sepia Wash dropper bottle and added water to thin it, then used it as a sort of glaze over all the highlighting to tone it down and tie it together a bit better.

With all of the bone finally done, I painted the raggedy rug thing on the standy-up bit (I HAVE NO IDEA WHAT THE ACTUAL NAMES ARE) Chocolate Brown and highlighted it with some added Flat Earth and Ivory. The horns were reprimed with a couple of thin coats of White to ready them for painting.
To be honest, at this point I was kind of disappointed with how the chariot looked. The chariot wasn't looking exactly how I'd pictured it in my head when I started painting it, and I was worried the different highlighting method meant it wouldn't match the skeletal horses. I gave up for the night and went to bed.
The next morning I had a change of heart, which shows that taking a break from a mini partway through painting it can be a good idea. In the light of morning I realised the chariot looked really good and I was a lot happier with the highlighting and shading. Yay!
I got the horns and teeth done using Ivory, Off-White and some Burnt Umber Wash. After that I painted the bones on the rug, which is officially what I'm calling it from now on, as they were a bit brown after the drybrushing. And I have to give credit to the sculptor who did this particular bone(r):

Well played, sir. The final bit was the snake that is for some unknown reason also on the rug. I painted it yellow with red stripes but it looked silly so I repainted it green.
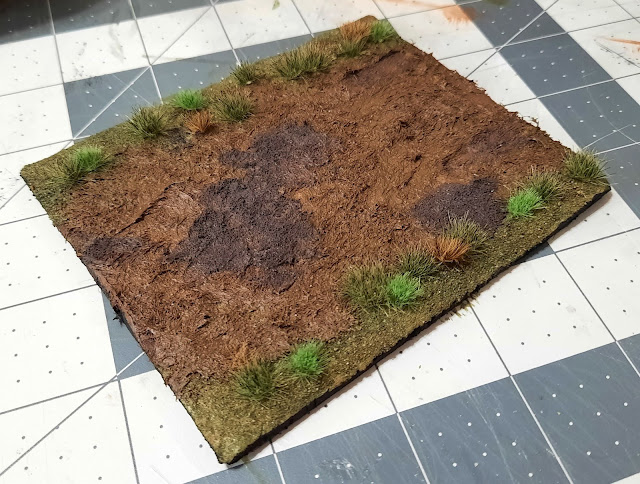
And now the base. I used a piece of foamboard and marked off a "path". The edges were painted with PVA and sprinkled with sand, then painted with English Ivy and Marsh Green craft paints and some Green Tone to shade it a bit. I wanted the centre to look muddy, so I painted it Chocolate Brown as a basecoat.
I covered the brown bit with Vallejo Mud & Grass effect paste and added some Citadel Stirland Battlemire to vary the colour and texture a bit. I used the end of a paintbrush to drag some wheel ruts in the mud, which sort of worked. After that it was a case of adding some tufts.
Oh well, that's the easy bit over. The next day was a shitstorm of trying to get Longhorn to stay glued to the chariot, and in the end I used Milliput and superglue to basically cement him on:

Yes it's a bit of a mess but by this point I was on the verge of tears and/or throwing Longhorn out the window. Once the putty dried I painted it Chocolate Brown to disguise it. And wow, it's all done!
I knew I couldn't glue the horses to the base without first dry-fitting the whole model so to make sure it was all in the correct position. So I tried balancing the horses and placing the chariot head's horns onto them, which worked fine for about 10 nanoseconds until one inevitably fell over, followed very quickly by the other one. This led to a lot of swearing, but I finally got them to balance in place long enough to get some photos:


Great work Matt, good to see through all your trials and tribulations you persevered and completed a fantastic looking piece
ReplyDeleteThanks, Dave! Despite it being a pain to set up on the base I'm well happy with it, and it was a small price to pay to get a classic sculpt completed.
DeleteThat's a lot of work gone into for just that one piece, but well worth it in the end imho.
ReplyDeleteNow just sit back, relax and admire your efforts until the next one !
Cheers, Joe, it was a lot of work but well worth it. I'm now going to shovel Thanksgiving dinner down my face and doze off on the sofa LOL!
DeleteSuper work Matt, the time and effort you've put in was clearly well worth the effort, imho. It really does look the absolute business. Enjoy your Thanksgiving Feast - I remember the days when I would always look forward to that as it meant another WWF Survivor Series with the Hulkster captaining a crew of four wrestlers.
ReplyDeleteThanks very much, Simon! And I have eaten Thanksgiving dinner, we're now watching a show about serial killers in Los Angeles and to be honest I can feel the food coma taking over...
DeleteSuch a cool finished result mate! The base is perfect for the chariot too.
ReplyDeleteThanks, Dai! I was worried how the base would go but it looks good. The Vallejo mud stuff is great for this sort of thing.
DeleteAwesome work Matt, love it.
ReplyDeleteThanks, Justin, it was well worth the effort.
DeleteI wasn't expecting you to get this done so quickly and it looks awesome to boot. I like the basing scheme you used once again and I think the tripod helped you take some pretty sharp pictures as well. This was a cool project and I'm curious to see what you tackle next! :)
ReplyDeleteCheers, matey! The base came out looking good, which is a result given I made it up as I went along LOL! The tripod was a huge help, I just wish Alicia had mentioned owning it months ago! I've got a few more projects lined up but they're all way smaller than the chariot.
DeleteNow that looks the "Doggies whatsits!" 😉 Top stuff mate.
ReplyDeleteCheers Roger.
Thanks, Roger, that's high praise indeed! :-)
Delete