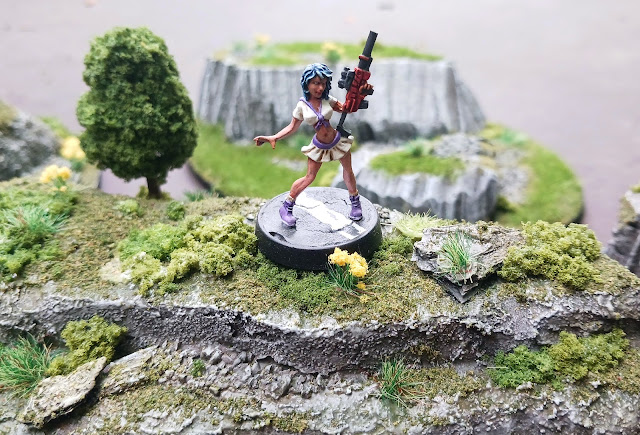
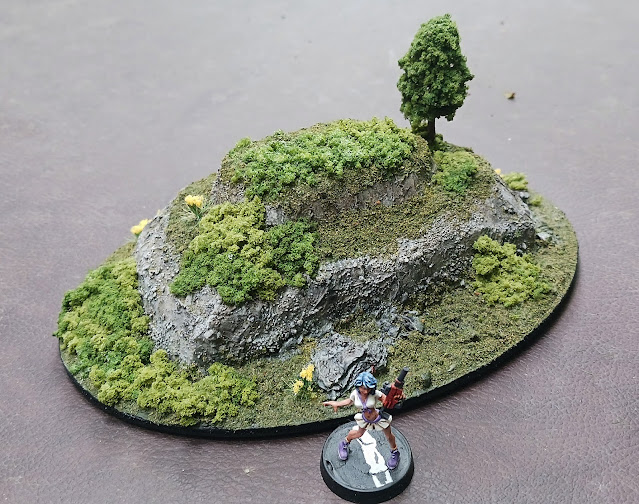
A cheerleader with a machine gun hangs out on the top of a rocky hill. Yes, it's another edition of "random female mini looks totally out of place on another bit of scenery" and this time it's Candy's turn to provide some scale.
I've mentioned that our spare room currently has a bath in it thanks to two of our four bathrooms being remodeled. On the one hand this is a pain in the arse, but on the other the delivery of two new vanities means I've got several large sheets of 1.5" thick expanded polystyrene foam to play with. The other day I decided to do something with them and knocked out these rocky hills.
Although they were all basically made, painted and decorated the same way, I used different techniques to get the textures on each one. To get the basic hills I simply broke off chunks of the foam and then shaped them with my hot wire cutter which also smoothed the surface of the foam. Once I was happy with how they looked the larger ones were stuck to 5x7" wooden bases and the small one to a 3" base and all were plastered with black Mod Podge.
The first one I made will forever be known as "the cake" thanks to Alicia asking me if I was making a slice of cake. Great. Anyway, to get the texture on this one I slapped on Vallejo Black Lava paste with a butter knife and used a toothpick to add some lines. I glued on random bits of gravel and some small pieces of bark to the tops and base and then set it aside to dry and got on with the other ones.
Once it was ready, the whole hill was plastered with Pewter Grey craft paint and then heavily overbrushed/drybrushed with Grey, Country Grey, Fog Grey and Granite Grey. I daubed on some watered-down Agrax Earthshade and Seraphim Sepia to add tonal variations and gave the rock a final light drybrush with Antique White applied in random areas. The base and tops were painted with Olive Green craft paint.
The base and tops were brushed with Mod Podge and sprinkled with a flock mix, then sealed with thinned matte varnish. Then it was simply a case of supergluing on clump foliage and tufts in random spots, and making some flowers by dabbing Mod Podge onto the top of some dark green tufts and then dipping them in Autumn Yellow loose foliage.
The small tree is one of the crappier ones from the set I used to make scatter terrain a couple of weeks ago. I just dunked it straight into the pot of Mod Podge and then dumped a ton of flock over it, and when it had dried I did it again to build more depth.
I went to town with the wire cutter on these two, using it to slice out some curved vertical ridges for which I'm sure there's a geological term but I don't know it. I decided not to use any kind of texture on the rock faces and just painted them the same way as the first hill, using homemade black wash to shade them and thinned Burnt Sienna to add some tones.
Again I used Mod Podge on the base and tops of the rocks and plastered them with flock, and then I used 2mm static grass to add some different vegetation. More tufts, foliage and flowers and they were done. These were by far the easiest and quickest ones to do as I didn't have to wait around for any texture paste to dry.
The final hill was covered with Liquitex modelling paste as my Black Lava stuff is on its last legs. While the paste was still a bit tacky I sprinkled a mix of crushed stone and sand over it and patted it down. When it dried the whole thing got sealed with black Mod Podge and then it was painted the same way as the first one. Again I used bits of tree bark on the base to simulate larger rocks.
Once all the painting was done I went to town with the foliage, flock and flowers and added a tree.
All of them had their base rims painted black, and they were done! On the whole I'm happy with them; they were simple to make and the hot wire cutter is a lot easier and faster to use than a knife. As I still have probably 20 square feet of foam left I'll be making more of these, although I really need to use more organically shaped bases than just plain oval ones.
More scenery to come soon: I'm still working on the MDF buildings, the cavern terrain is done and should be posted soon, and I have something a bit Slaanesh in the works! If I've said it once, I've said it a zillion times: stay tuned!
Halloween... in July?
The Halloween tat is coming in thick and fast at work. Of course, we have nowhere to put it but why would our distribution centre let a little thing like that get in the way? And if you think it's crap that we've got this stuff out almost four months early, the local WalMart already has Christmas stuff on the shelves...


Personally I'm a massive fan of your "random female mini looks totally out of place on another bit of scenery" series of posts, so absolutely loved this, Matt. LOL!!! Seriously, the scenery looks awesome, and its great to see household skills being utilised for wargaming :-)
ReplyDeleteIn that case you're lucky, Simon, as there are more random female minis looking out of place on scenery to come!
DeleteExcellent work on the scenery hills Matt, all your added vegetation is what really makes your pieces look so good, so keep it up. Look forward to seeing what else you come up with over the coming weeks.
ReplyDeleteThanks, Dave! Adding the vegetation and trying to get the scenery looking overgrown is the bit I like the most about these pieces, I just keep having to remember to make it as random as possible :-)
DeleteNice work on the cake, sorry rocky hill! In fact nice work on them all actually! :-)
ReplyDeleteHaha! Cheers, John, and I have learned not to make another slice of cake :-)
DeleteYou see Halloween tat, I see the opportunity to score some cheap plastic decorations that can be repurposed. A string of neon plastic spider lights? Nah, that's an infestation of alien bugs ready for some marines to blast the crap out of. Skeletal rat? No, that's the avatar of some mouldy old Babylonian god manifesting in downtown Chicago, so you know who you're gonna call, right? Tat to tabletop... hmmm, that wouldbe a good name for a blog.
ReplyDeleteThat is a good name for a blog, Jez! I see Halloween tat because I have to put it on shelves that are already overflowing with summer tat, back to school tat, houseware tat and tat of many other different types. But you are right about how useful and cheap it is and I've already got plans for some of the tat I've been putting out.
DeleteHalloween Dollar Store stuff is generally.... awful. There, I said it.
ReplyDeleteLoving these hills tho! used to have a pile of old polystyrene packing set aside for projects like this in my old house but after moving out I am assuming my ex has long since binned the lot. LOL
Generally it is, Dai, but it's a useful source of cheap skulls :-)
DeleteIt wouldn't be the US if we didn't over-commercialize and over-hype the holidays! :D I really like the hills you've been working on and I'm curious what you're going to do with all this great scenery in the future. Its going to be impressive whatever it is!
ReplyDeleteCheers, Jeff! I have a few ideas for how to use this stuff and it's just a case of getting off my backside and doing it LOL!
DeleteThe terrain looks great, Matt! I like that you varied the techniques you on them. It will add some nice variety overall, but also really interesting to see how they came out. I actually thought your "crappy tree" looked good! Guess I have no taste, haha!
ReplyDeleteThanks, Brian! The different techniques all worked well, and believe me, the tree really did look crappy until I dunked it in a ton of flock :-)
Delete