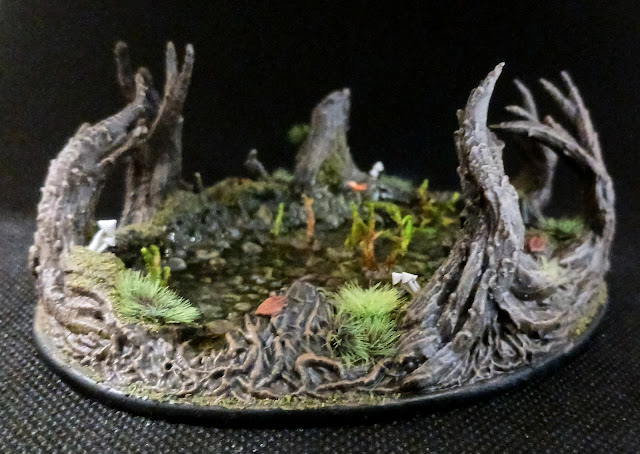
Well, well, well. Guess who's discovered the joys of resin?
Actually, I did my first resin pour last month as part of the cavern terrain I made for my goblins. And I still need to post those pics. But this was a bit more involved, what with actually having to paint it more than three colours and use lichen to simulate weeds.
Please excuse the crap photos. I had a hell of a time taking pics of this thing thanks to the resin reflecting the kitchen lights all over the shop.
I forgot to take a pic of the bare resin model, so here's a render nicked from the Etsy shop. Asgard Rising does a lot of really good fantasy stuff and this pond caught my attention. It's actually a base, not a piece of terrain, but it looks good painted up as a mysterious forest pond.
All the stones were given another wash with thinned Agrax Earthshade to define them a bit better and tone down their colours, and then they were given a light drybrush with Beige to tie them all together. A final wash with Athonian Camoshade and they were finished.
With the bed of the pond done it was time to hit the trees. More overbrushing, this time with Dryad Bark and then Dryad Bark and Mahogany Brown brought out all the gnarly details, and a much lighter drybrush with a mix of Khaki and Ash Grey finished them off nicely. All the wood was then given a once-over with some Seraphim Sepia to tie the colours together and I added some random splotches of Athonian Camoshade and Biel-Tan Green here and there to break up all the browns.
After giving the whole model a coat of matte varnish it was time to add some vegetation. I daubed on PVA glue and sprinkled my usual flock mix over it to add moss, and used some small tufts for plants.
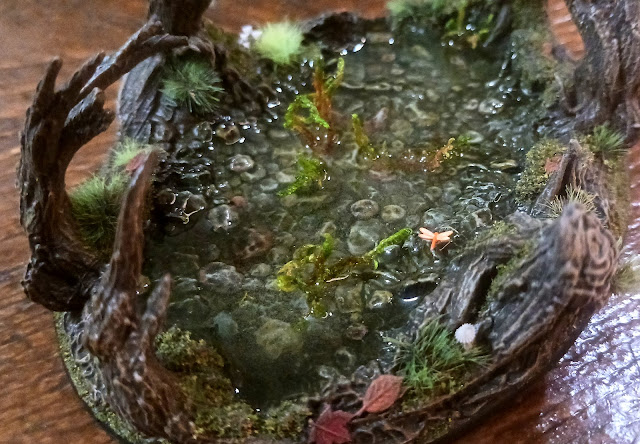
I wanted something sticking out of the water to add some more visual interest, so I used bits of lichen which were first painted with matte Mod Podge to stiffen them and then superglued in place on the pond floor. All the flock was sealed with thinned Mod Podge and left overnight to dry.
OK, time for the resin. This is the stuff I use:
It's just Michaels own-brand two-part resin and costs $20, which makes it one of the cheaper ones in the store. I bought a load of small plastic containers (the kind you get in delis) to mix the resin and it was pretty easy to do. I had to eyeball the amounts of resin and hardener I poured into the cup, and then I added a couple of drops of Coelia Greenshade wash and spent a good couple of minutes stirring it together with a lollipop stick.
Pausing to promise the Dark Gods a suitable sacrifice if things went well, I began to pour the resin into the pond. It flows evenly and after filling the model at the left end I tilted the whole thing to let the resin run down into the right end and get into all the nooks and crannies. Once the resin had flattened out I poured in more, again moving the model around to make sure I got it where it needed to go. It looked just right, so I put it on my desk and placed a plastic bowl over it to keep off the dust and dog hairs.
The resin is supposed to dry in 24 hours and be fully cured in 72, so I just left it for three days. When I checked it the resin had dried solid and looked great. The Coelia Greenshade added just enough of a tint to give a slight blue-green look to the water, the lichen was sticking up nicely and the whole thing was, I have to say, awesome. There are a couple of small bubbles in the resin but I'm not too bothered as they just add more realism to the piece.
There were a few more details I wanted to add, so I got out some tiny mushrooms I bought a while back and painted them Corax White, Soft Tone and Off-White. The dragonfly is pretty much the smallest mini I've ever painted and it looks great. I painted it White and then used Wild Rider Red on its body and the world's gentlest drybrush with Fire Dragon Bright over its wings. Gluing it in place was fun and games, but happily it finally stuck where I wanted it to go. The mushrooms were stuck on and it was done.
I don't like the leaves that are part of the 3D print as they're out of scale and why there's one maple leafe is beyond me, unless the modeler is from Canada. I'll use more flock to cover them over at some point.
Public service announcement
If your pot of Vallejo Gunmetal ever jams up, whatever you do get off your arse and find something to unblock it. Do not do what I did and just squeeze the bloody bottle until the above disaster happens. We live and learn.


excellent work on the pond Matt, and great use of the clear resin, hope you got a few more projects to use up the rest soon, as once the tins been opened it starts to go off, you've got about 6 months. Whenever pouring resin and you want to get rid of bubbles, put the piece on a board, and then put a jigsaw on the same board and turn on the vibration will give you the same effect as a shaker table.
ReplyDeleteCool idea!
DeleteIt's what I used to do until I got my vacuum chamber ! LOL
DeleteCheers, Dave! I have to admit to being puzzled as to why one of Alicia's jigsaws would help with the bubbles until I realised you meant the saw LOL! I don't mind the bubbles in this one as they do add realism but as I don't own a jigsaw I'll have to come up with another solution, maybe put it on top of the washing machine when it's on spin mode :-)
DeleteOh, wow! OH, WOW! Resin scares the hell out of me, so you are like some kind of wizard to my eyes. It looks perfect, I love the result, seriously, it looks so natural! Congratulations, I mean it!
ReplyDeleteOh, and I've also been at that very spot with Vallejo, so I feel you! :D
Suber, given the scenery you come up with by just looking through your trash can I will take that as a very high compliment! I was nervous about the actual resin bit but it went way easier than I thought and has given me the confidence to do more :-)
DeleteI like this piece a lot. How big is it? Could you place a mini next to it to give an idea of scale?
ReplyDeleteThanks, Dai! It's about 4x3 inches and the trees are just over an inch tall. I'll take a photo with a mini next to it on my next post.
DeleteI was using floral water, also a 2-part compound, but it never really cured properly. Then Roger turned me on to Vallejo water effects and I've never looked back!
ReplyDeleteI have to admit to being a bit worried that this is own-brand stuff, Keith, but it does the job perfectly. And you can tint it with washes or completely colour it with paint, so it's pretty versatile. Vallejo Water Effects is great stuff from what I've seen of it but this is perfect for a total beginner like me.
DeleteVery nice work, Matt! The finished product looks really natural and the resin came out really well. I've only dabbled with resin in the past but seeing this makes me want to give it another go sometime soon!
ReplyDeleteCheers, Jeff! It was far simpler to do than I thought and worked very well. And it's yet another skill to add to my repertoire!
DeleteThat is a superb bit of work sir! I wish I'd gone for clear resin on my pond from a few years back as the Valejo water effect has sunk a bit and I've had to top it up a couple of times now. 🙄
ReplyDeleteSorry for being AWOL for a few of your posts, rest assured that I have been keeping up with reading them, and you never fail to impress mate.
Cheers Roger.
Thanks, Roger! The cheap resin does a really good job and I was surprised at how good it turned out. I've heard really good things about Vallejo Water Effects, but on the other hand I've heard/read a few bad things about it too. For now I'll just be sticking with the cheap stuff :-)
DeleteLooking at that, I would've thought you had been making resin dioramas for years! That turned out really great, buddy! I'm actually hoping to build a pool to go with my dungeon tiles, so I might try that same resin and give it a greenish tint. The vegetation sticking out of the pond and that wee dragonfly all add to the amazing piece! I'm also very aware of your PSA.....unfortunately that's my one big pet peeve with Reaper paints, the tips get clogged almost all the time! Before I learned about T-Pins, I had many an accident where I squeezed the damned bottle too hard. One time managing to squirt half a bottle of paint out. Ugh.
ReplyDeleteThanks, Brian, it turned out so well I still have trouble believing that I did it LOL! The weeds sticking out of the pool were a bit of a gamble as I wondered if they'd flop over into the resin but they worked too. I think using the Mod Podge to stiffen them was the right way to go.
DeleteImpressive, Matt! :-) A very nice piece of scenery indeed!
ReplyDeleteCheers, John, I appreciate that!
DeleteSuperb work, Matt. That has worked out so very well indeed. What a crackingly good water feature you've created. Top marks my friend - You've almost tempted me to try out some resin water effects myself. LOL!!
ReplyDeleteThanks very much, Simon! It was a hell of a lot easier than I thought; as long as you make sure the resin is mixed properly and cover it while it dries you should be good.
DeleteWell done with this piece, I'm always apprehensive of usingresing so I take my hat off to you.
ReplyDeleteCheers, Joe! I too was apprehensive but happily it went really well :-)
Delete