

The GT-R... Dear God, the GT-R. It's currently killing my will to live, so I thought I'd get another 1/43 car to bugger up as I was in the mood. As my closest dollar store only has a Ferrari in stock I went to the one in Bennington to discover it also had one model: a bright red BBurago Mini Cooper S. Here's Destiny looking dramatic in front of it.

I used to own a Mini (a basic model, not an S). In this photo it's being taken away by a charity back in June a few months before we left California. I donated the Mini because after 14 years and 198,000 miles it was worth about $800 and I couldn't be arsed with the hassle of selling it. These days I own a Subaru Outback, which is a much more sensible car for Vermont.

New Minis don't rust that much, at least according to the google. So, as with so many of my modelling projects, I had to bullshit my way through this. First off was taking it apart, which was a lot simpler than the GT-R; I just had to undo two screws. With its top off (ooer!) I started hacking the paint off with an X-Acto knife.

I had to take a few liberties. On a real Mini the lowest bit that runs around the bottom of the car and over the wheels is plastic; it's usually black but you can pay extra and have it in the same colour as the body. I didn't fancy painting this part black, so I just scraped paint off it.

In real life the white stripes on the bonnet (hood to the Americans) and white roof don't discolour, so I left them alone. The stripes do not go all the way up to the windscreen, but I left them as they are. I don't own any gloss red paint to erase part of them and it's not like I'm entering this thing in a competition. The supercharger scoop on the bonnet is going to be painted black and I'll pop some of the lights off too.
The paint carved off very easily. The only issue was controlling the blade, as it had a tendency to shoot across the body and scratch the paint. As usual with this type of project, it was difficult to know when to stop. I don't want it to look like an absolute rustbucket (in other words, my old Ford Sierra) so once I'd reached a point where I was happy I put down the knife and stepped away from the desk.
Why is it that I always spot problems when I'm 50% of the way through a project? In this case, it's the paint: it's way too glossy for a car that's been sitting around long enough to rust. Jesus. Matte varnish was the first thing to spring to mind, so I tried brushing some on the rear number plate. Even thinned there were brush marks when it dried. I had no choice but to crack out the airbrush, set it up, fill it with thinned varnish and hope for the best.

Well bugger me, it worked. It even added a patina of dust to the glass and fogged the remaining headlight, so consider me chuffed! The downside is I painted the supercharger scoop all black, then remembered that on S models the surround is the same as the body colour. Oh well. Time for the rust paint.
Each patch of bare metal was dabbed three times with Vallejo Dry Rust to build up the texture, then I mixed the remaining paint with Rust to go over it. I think I over did the orange and should have just left more of it the browner colour, but I'm happy with it.
One thing I'd liked to have done is leave one of the doors open, but I have no way to cut one out. So I put some Blood for the Blood God on a toothbrush and splattered the inside of the windscreen and driver's window. I tried to break the passenger window but failed, so I just (badly) scratched it with my knife.

I realised the Mini needed to be sitting on flat tyres, so I warmed them up with a cigarette lighter and pushed them onto a piece of foamboard to flatten them. Shortly after that, me and the dogs had to abandon the spare room because of the stench of burning plastic. Don't try this at home, kids!
The other wheel was cut off and repositioned to look like the axle is broken, but thanks to some inept supergluing on my part you can barely tell.
OK, I do not want this to be another two-part post so I'm skipping to the end. Suffice to say that like the GT-R this project caused me all sorts of headaches in terms of trying to work out how to do stuff, realising I didn't have the necessary tools (or talent) to do exactly what I wanted to do, breaking bits I didn't think I'd need only to discover the next day that I did need them, and as for the base... Jesus. I could have bought, built and painted a 40k scale Warlord Titan quicker and with less headaches.
So here it is:


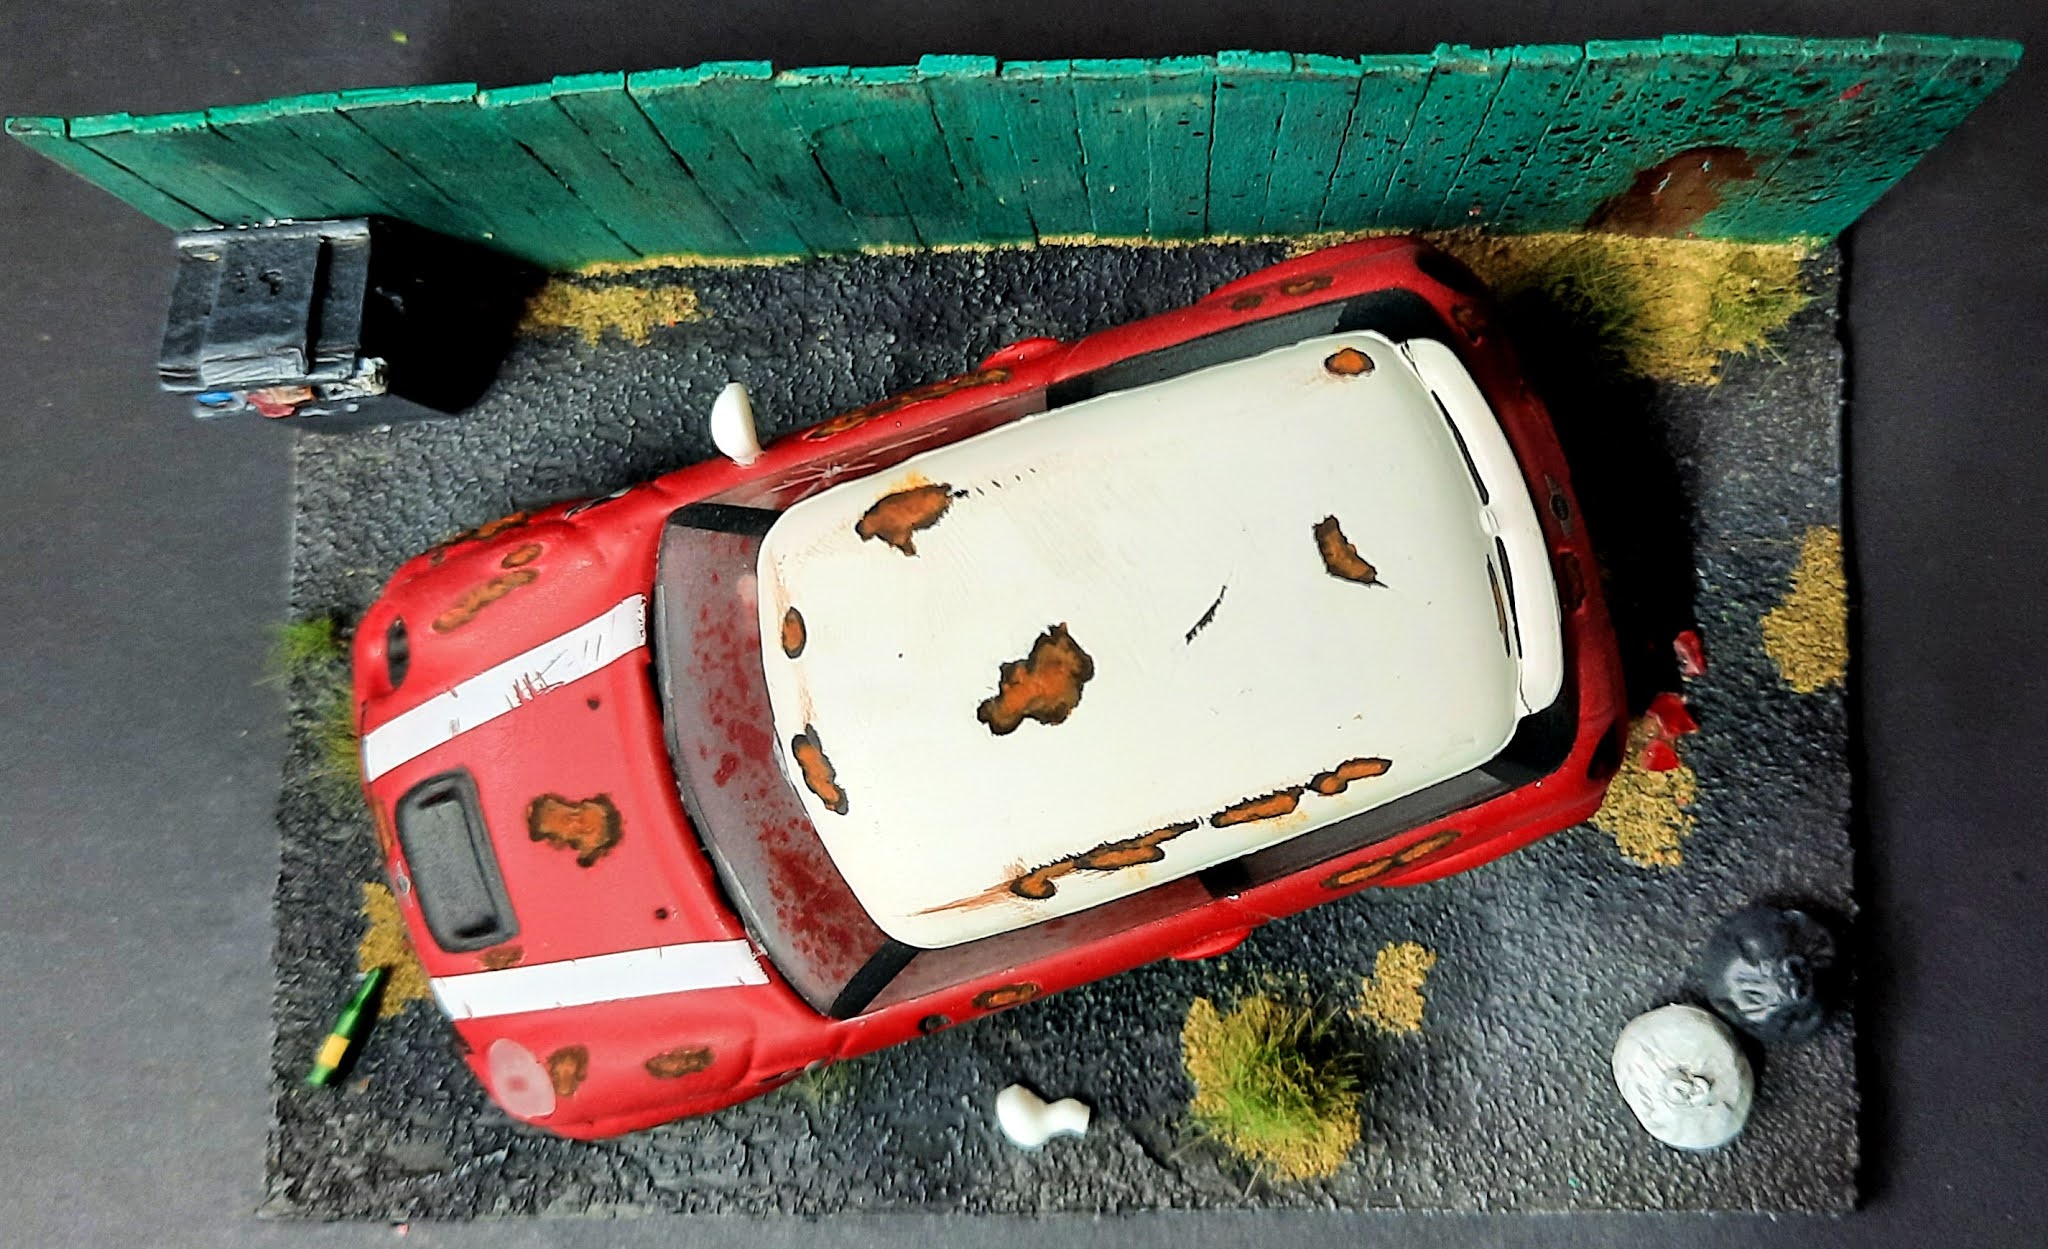
A few things: the base is two oblongs of chipboard glued together, sealed with black Modge Podge, covered with Vallejo Black Lava and drybrushed with greys. It warped. Great.
Yes, I did make a new fence for this. It took all of five minutes to make and not long to seal, paint, distress and varnish. The weird shape on its right is Blood for the Blood God swiped and splattered onto it. It didn't really work. The fence is held to the base with a line of hot glue, some pieces of coffee stirrer at its back, the wheelie bin at its front, and sacrifices to Cthulhu.
I washed random areas of the base with Black Wash, added glue and dumped on flock and tufts. Once they were on I placed the Mini for reference and then added the trash bags, broken brake light, mirror and bottle. The final thing was to hot glue the Mini in place, which went better than I thought; in other words it only took two attempts. Then I regretted gluing the Mini as the base would have been great for taking photos of zombies and survivors.
But, for all that, for all the frustration and screaming and internal debates about taking up heroin as an easier and cheaper hobby, I'm happy with it.
If I did this again — and let's be honest I'd have to be ripped to my tits on meth and absinthe to even contemplate doing this again — I'd strip the paint off completely, spray it orangey-brown, and use the airbrush and chipping medium or liquid mask to do the rust.
The GT-R will be finished, honest, but for now Ann's got another painting challenge for April so it's back to painting normal minis.
Turned out great Matt, interesting to read all your learning experiences as you've tackled these projects, although building a titan would take longer with all the piston adjustments needed to pose the damn thing ! LOL
ReplyDeleteThanks, Dave! Although it could have been better, for a first attempt at doing something like this I'm pretty happy with it. It certainly was a learning experience in terms of realising I really have to plan out the steps in advance and not keep having to stop to work out how I'm going to do something I should have done four steps before.
DeleteLike I said, if I (and I probably will) do this again I'll just take the paint off completely and use the spray-and-mask technique.
I know those 40k-scale Titans exist but I had no idea that the body alone is almost $2000!
They are not cheap ! LOL
DeleteIt looks like the whole thing would cost north of $3500, which is just unbelievable!
DeleteLooks great Matt, love the patina the matt varnish gave it, and your little diorama base came out a treat too.
ReplyDeleteYou could probably buy a real mini cooper for $3.500 these days!
Cheers Roger.
Thanks, Roger! You could have definitely bought my old Mini for a third of that lol!
Delete